
Sprite
Basics
by Mark Quinn

Before you can create your own skins for Legacy,
you must know about how to make sprites. Here is a quick primer.
Naming Format:
All sprite graphics in DooM, DooM II, Strife,
Heretic, and Hexen follow the same naming format. Here it is:
NameX#Y#
Name is
a four letter name used for all sprite graphics in a sprite family.
The name used by all the player sprite graphics is PLAY, for example.
X is a
letter that identifies the current moving phase represented by the sprite
graphic. Here is an example showing the phases used by the player
when he walks:

|

|

|

|
|
PLAYA1
|
PLAYB1
|
PLAYC1
|
PLAYD1
|
# is the
viewing angle from which the sprite graphic is meant to be seen.
There are eight different viewing angles used by DooM. They are arranged
in 45º increments.
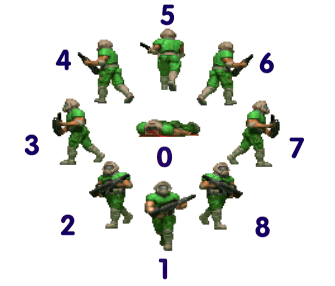
There is also a special angle, angle 0 (a note
on that shortly).
Y and #(optional).
This second phase and viewing angle tell DooM that the sprite graphic is
also
to be used for phase
Y
and viewing angle #,
and that it will be mirrored when drawn on screen.
This is used by DooM as a way of cutting down
the number of sprite graphics that need to be drawn.
id, for example, only created marine sprite
graphics for angles 1, 2, 3, 4, and 5. There are no marine sprite
graphics for angle 6, 7, or 8. In order to allow the marine to be
seen from all angles, the second phase and angle are used so that the sprite
graphics for angles 2, 3, and 4 will be mirrored and used for angles 6,
7, and 8.
In this manner, the DooM marine
only requires 20 sprite graphics for his walking sequence, instead of 32.
|
Angle
0
In
addition to the eight regular angles mentioned above, there is one special
angle, angle 0. A sprite graphic marked with an angle of 0 will always
be displayed from the same view, regardless of which way it is facing.
Dead bodies, and all other stationary objects in DooM use angle 0.
Why
have a sprite that always faces the same way?
There
are two reasons for this:
The
first reason is simply that it is a lot easier to create one sprite drawing,
than it is to create eight. The existing DooM marine uses angle 0
for his death sequence and his exploding death sequence. This cuts
the number of sprite drawings he uses down considerably.
The
second reason for having angle 0 is that the 45º turning increments
used by DooM are too coarse to look effective on stationary objects in
the game. As the player moves around an object, it will appear to
keep the same pose for a full 45º, then suddenly jump to a new angle.
This is very jarring to look at. Imagine what it would be like if
all of the scenery objects in the game jumped around like this. It
wouldnt be very much fun. It would be very distracting. 0
angle sprites dont jump between views, and tend to look much better in
the game.
Note:
If you use angle 0 for the angle of your current sprite phase, you can
not
use sprite graphics with other angles for the same phase. You may
use either the eight angles, or you can use angle 0, but you may not use
them together.
(DooM
gets really ticked off if you do.)
|
Transparent Areas:
This may seem really basic to those of you
who already know, but in case you dont, I should point out that the areas
you wish to be transparent in your sprite graphics must be painted
entirely in cyan (Colour 247 on the DooM palette).

X and Y Offsets:
There is one more thing you must remember when
adding sprites to a wad; an x and y offset must be provided for each and
every sprite graphic you add.
DooM draws all of its sprite graphics in relation
to the ground spot on which the creature/player/object is standing.
The x and y offsets adjust the position of the sprite graphic so
that it displays correctly in relation to this ground spot.
Without the x and y offsets, your sprite graphic will be drawn with its
upper left hand corner at the ground spot, and the sprite will appear
to be burried in the floor!
Whoops!
Below is a shot of the wad editing screen in
Wintex 4.2. In the upper right hand corner is a pair of slider bars
to help position the sprite graphic. A black cross hair indicates
the position on the ground spot.
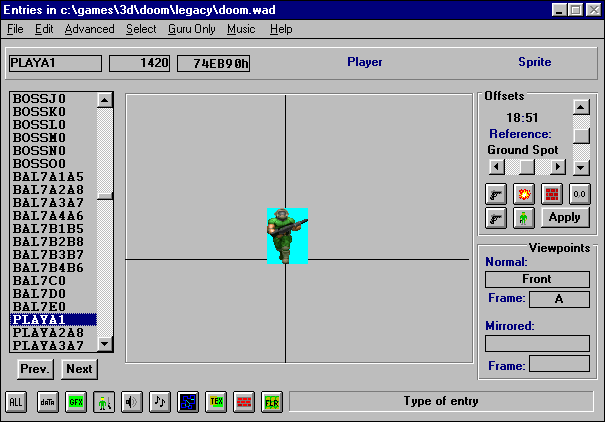
You will notice that the graphic is intentionally
set slightly lower than the ground spot. This is to ensure
that the sprite appears to be firmly planted on the ground, and not floating
just above it.
Thats it for sprite editing basics.
Pretty easy, eh? I hope this gets you up and running on your sprite
editing projects.
Good Luck!


