Main | Tools
and Materials | Cutting the Rings
| Knitting the
Maille | List of Weaves
My Armour
Project | My Other Projects | Accessories
| List of Armour Terms
Main | Tools
and Materials | Cutting the Rings
| Knitting the
Maille | List of Weaves
My Armour
Project | My Other Projects | Accessories
| List of Armour Terms

This page is currently under construction.
Please be patient while I get it working.The first step in making maille is to wind your wire into coils. These coils will be cut later to create rings.
Winding Coils By Hand
To wind the coils, you will need a mandrel. A mandrel is a metal rod or a wooden dowel, which is the size you want the inner diameter of your rings to be.
In order to turn your mandrel to make the coils, you will have to create a crank arm.
To create a crank arm on your mandrel:
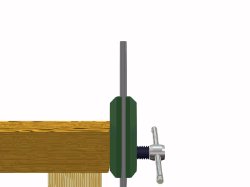 |
Place your steel rod in a bench vice, such that it is held firmly with about 5 inches of it protruding above the vice. |
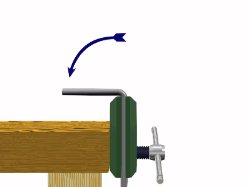 |
Gently hammer the rod until it bends over at 90º. (Be careful not to damage your vice.) |
 |
Loosen the vice, and reposition the rod so that another 5 inches of it protrudes above the top of the vice. |
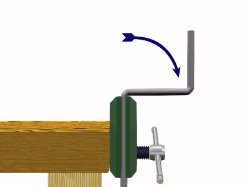 |
Resecure the rod in the vice, and hammer the rod over again in the opposite direction to what you did before. |
Some adjustment will probably be required, but this should be able to produce a good and comfortable crank arm for your mandrel.
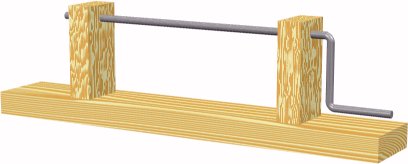
The mandrel requires a stand in order to turn. This is extremely simple to make. All that is needed is a large piece of wood for a base and two uprights. The mandrel itself fits through a pair of holes drilled through the uprights.
The piece of wood used for the base should be wide enough to keep everything stable while the mandrel is being turned. The uprights need to be long enough to allow the mandrel to turn freely, and avoid ones rapping his knuckles against the base.

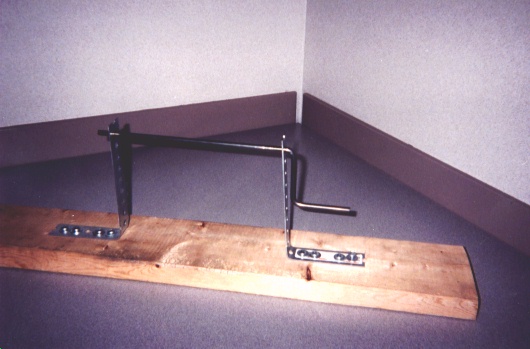
Here is a photo of my own mandrel with its stand. The base is made from a scrap piece of 2" x 6" for stability. Instead of wood, Ive used steel for my uprights, but otherwise, it is the same as described above.
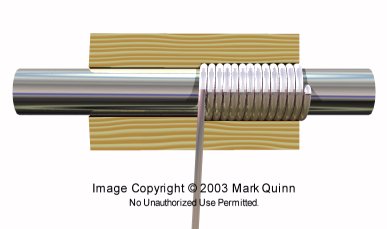
To do the actual winding, start by securing the wire to the mandrel. This can be done by either inserting the wire through a hole drilled through the mandrel, or, as in the above photo, by clamping the wire to the mandrel with a small pair of vice grips. Once the wire is secure, turn the mandrel with the crank arm, while carefully feeding the wire on to the mandrel with one hand.
Clip off the wire with a pair of wire cutters or snips when your coil reaches the full width of your mandrel.
You will now have a coil ready for cutting.

You will have to make a lot of coils. Youre going to need them!
Using A Drill to Turn Your Mandrel
It is also possible to turn the mandrel by using a power drill instead of a crank arm. Instead of bending a crank arm into the mandrel as explained above, one simply inserts the end of the mandrel rod into the chuck of the drill like so:
Most drills can accommodate rods or dowels of up to 3/8" in diameter. Larger sizes will likely require that material be removed from the end of the rod, in order for it to fit into the chuck.
Although turning the mandrel with a power drill can be faster than turning the mandrel by hand, it can also prevent a few hazards, as noted below.
NOTE: If you use a power drill to turn the mandrel instead of a crank arm, do not secure the wire to the mandrel with vice grips, as this can set up a situation with a potentially dangerous projectile. Insert the wire into a hole through the mandrel instead. Also use gloves and safety goggles if you are using a power drill to turn your mandrel. This is because the end of your wire, if it gets away from you, can be whipped around by the turning mandrel, creating the potential for painful lacerations and eye damage.
It is also possible to wind your fingers onto the mandrel if you are not careful (A potentially painful experience).
You have been forewarned.
Constructing A Winding Jig For Drill Cranked Mandrels
If the hazards of winding with a power drill fill you with trepidation, then you will be glad to know that it is possible to create a special winding jig that will greatly reduce these troubles. It is also darned simple to make.
The winding jig is made from two pieces of scrap 1" × 2" wood, preferably hard wood, 2"3" long.
To begin making the winding jig, you must first create a notch down the centre of the two pieces of wood length wise.
Clamp the two pieces of wood together so that the notches you cut in them match up, forming a pilot hole.
Using the pilot hole, drill half way through the pair of wood blocks with a drill bit that is equal in diameter to your mandrel.
Then drill half way through the pair of blocks from the other direction with a drill that is equal to the diameter of your mandrel plus twice the diameter to the wire you are using. This is the same as the outer diameter of your rings.
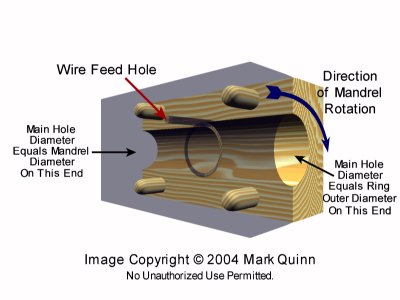
You must now drill the hole through which your wire must be fed. This part can be tricky.
The hole needs to be equal to or just slightly larger than the diameter of your wire. It must be drilled through one of the two wood blocks at the point where the existing larger and smaller holes meet from the larger of the two. The hole must also be drilled at a tangent to the larger hole. If this wasn't already difficult enough, the placement of the hole must be such that the wire can easily feed onto the mandrel via the hole. If this is not correct, the wire will jam.
All this explaining is probably as much confusing as helpful. Perhaps a diagram will help here.
Here is a view of a winding jig with one half made transparent for some clarity.
The dark thing in the upper centre of the picture represents the hole I have so pains takingly told you how to create.
There. I hope that helps.
In the picture above, a series of dowels, set at each of the four corners, is used to help hold the jig together and line the two halves up while it is in use. Although it is not entirely necessary, it most certainly helps.
Here is the winding jig in action. Only one half of the winding jig is depicted here. Otherwise, you wouldnt be able to see a bloody thing!
As the mandrel turns, it draws the wire into the jig by way of the hole in its side. The larger portion of the main hole in the jig forces the wire around the mandrel. As the coil is wound, the mandrel to slowly withdraw itself from the jig.
With the two halves clamped together using a C clamp, the winding jig can actually be held in ones hand while winding. As a precaution against potential injury, it is probably better to secure the winding jig in a bench vice while using. It will also make the process of winding faster and easier.
The only real problem with a winding jig is the fact that it can only be used for the specific mandrel and wire size it was designed for. If a different sized mandrel, or a different wire gauge is to be used, an entirely new winding jig will have to be constructed. Of course, once your collection has started to grow, making new jigs for different ring sizes will become less and less of a problem.

Sorry. Hes
not quite finished yet. Try this page again later.
Winding the Coils
Main | Tools
and Materials | Cutting the Rings
| Knitting the
Maille | List of Weaves
My Armour
Project | My Other Projects | Accessories
| List of Armour Terms