
Main | Tools
and Materials | Winding the Coils
| Knitting the
Maille | List of Weaves
My Armour
Project | My Other Projects | Accessories
| List of Armour Terms

This page is currently
under construction.
Please be patient
while I get it working.
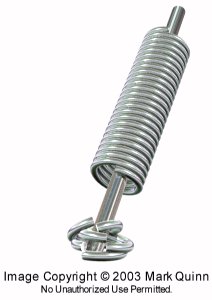
Now that
you have your coils, it is time to cut them into rings*.
(*If
you want to get technical, the rings you are making are known as jump rings.)
First we will
take a quick look at some of the methods one can use to cut rings:
|

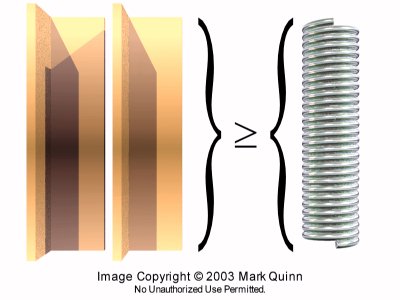
The most obvious
method to use when cutting wire, but not really a good one for cutting
rings.
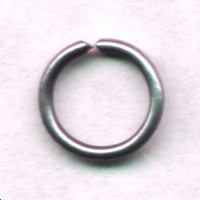
Wire cutters
cut by pinching through the metal. This produces distinct chisel
shaped ends, like those in the example to the left. These ends are
impossible to close tightly, and rings cut using wire cutters often slip
apart.
Wire cutters
are much slower to use than aviation snips, and require a lot of hand pressure
to pinch through the wire. The first time I cut rings with wire cutters,
my hand was aching after cutting only two coils.
If you plan
to cut a large number of rings for your armour project, I definitely recommend
that you do not use wire cutters.
|
|

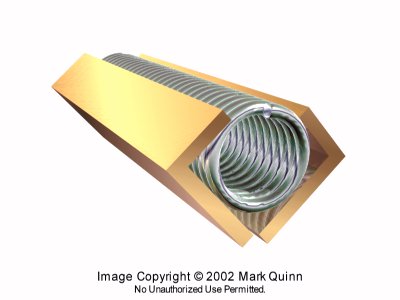
This is the
method of choice for most butted maille makers. It is the fastest
way to cut steel rings up to 16 gauge (Standard Wire Gauge) or 14 gauge
(American Wire Gauge), and produces good clean ends for a good butt, though
not quite as clean as those produced by a rotary tool. There is nothing
more satisfying than the rapid pop-pop-pop-pop of a pair of snips cutting
through a coil.
The major drawback
I find with snips is that the shearing action pushes one end of the ring
up, and the other end of the ring down, distorting the rings as in the
example to the left. This tends to make it more difficult to close
the rings during the knitting process, since each ring must be pushed back
into shape.
|

|

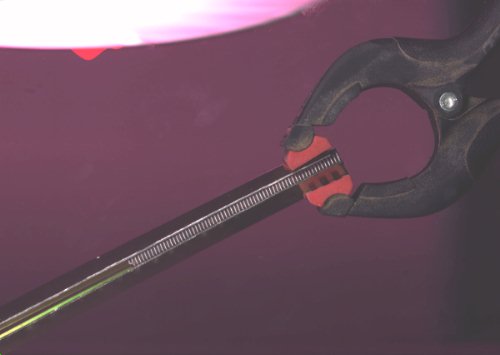
Produces the
best finished product of all the methods described here. The cleanly
polished ends butt so neatly and tightly together that the joints are virtually
invisible at a few paces away, and only a fine line is visible up close.
This is my
cutting method of choice, but it is not without its problems:
The most noticeable
problem is speed. Of the three methods described here, the rotary
tool is by far the slowest. It is possible to increase the rate at
which a rotary tool cuts rings by using oil, however. (See below.)
Another noticeable
problem is that a rotary tool tends to turn rings into projectiles as it
cuts through! A couple of simple methods (described below) can be
used to eliminate this problem.
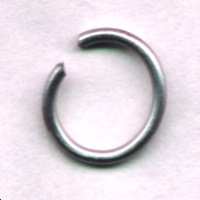
The last problem
is rather minor. Because the rotary tool cuts the rings by the use
of friction, a small amount of material is removed from each ring.
This leaves a gap of roughly 1mm in the ring, as in the example to the
left. When closed, the diameter of the ring is reduced by about 0.3mm.
This is negligible for most ring sizes, but can be a problem with very
small rings. |

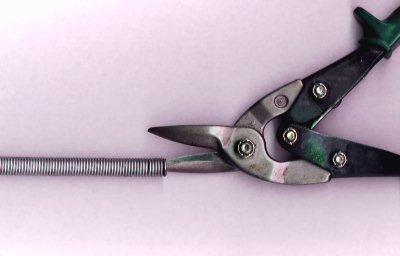
Cutting rings
is dead simple with both wire cutters and aviation snips. Just stick
the bottom jaw of your cutter into the coil and squeeze. Of course
aviation snips are much easier to use. Wire cutters require more
hand pressure, and can only cut one or two rings at a time, whereas a good
pair of snips will cut three or four rings at once with only minor effort.

The first thing
to address when cutting rings with a rotary tool is the issue of safety.
As mentioned above, rings tend to be thrown as projectiles as the rotary
tool cuts through. This, of course, is not acceptable. It is
possible to virtually eliminate this problem, however, using one of two
simple techniques:
The
easiest technique is simply to slip a rod or thick wire down inside your
coils while you are cutting (Do NOT use your mandrel for this!).
As each ring is cut free, the rod or wire will be able to catch it before
it becomes a projectile*.
The primary
disadvantage I have found with this technique is the need to frequently
stop and remove loose rings from the wire. Progress using this method
also becomes more difficult as the coils become shorter and more difficult
to handle.
The second
technique for cutting coils without airborne projectile rings involves
creating a set of brackets to enclose the coils while they are being cut.
The brackets are made using decorative alluminum angles, which are available
at many hardware and building supply stores (i.e. Canadian Tire or Home
Depot).
Cut two lengths
of the decorative angle that are equal in length to, or slightly longer
than, the length of your longest coils. Your angle pieces should
be of a size that allows them to fit around your entire coil, but still
be able to hold the coil firmly, without alowing it to move.
Remove approximately
2mm of material from one edge of each bracket. This is to create
a channel you can run the rotary tool down in order to cut the rings.
Place the brackets
around each coil, and clamp them at one end with a spring clamp (You may
need to file a notch in the end of the spring clamp to allow it to hold
better.). While cutting, hold the brackets and clamp with the clamp
closest to your body, and pinch the other end of brackets tight with your
fingers. Slowly run the cutting wheel towards yourself in the channel you
created in your brackets, with as little pressure as possible to reduce
wear on the cutting wheel.
With this technique,
the rings will rarely, if ever, fly off*, and in addition, each ring as
it is cut off will slide down between the brackets like a chute.
If you place a container on the floor in front of you as you are working,
it will collect the rings neatly and easily.
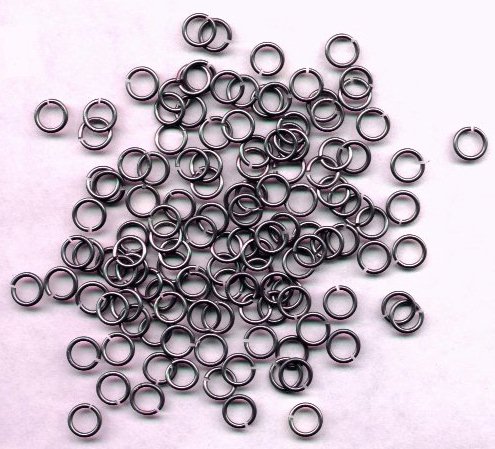
And if
everything goes well, you should eventually have a whole lot of these:
|
*One
more note regarding safety:
WEAR YOUR
SAFETY GOGGLES, YOU BLOODY FOOL!
Although
the techniques outlined above reduce the number of flying rings to almost
zero, rings and small pieces of wire can still be thrown from time to time.
|
Two more problems
that need to be addressed when using a rotary tool to cut rings are the
speed at which the tool cuts, and the length of time each cutting wheel
lasts before wearing out.
Luckily, both
of these problems can be alleviated to some degree by the applying oil
the coils as they are being cut. Canola oil seems to work best.
In my experience, adding Canola oil to my coils as I am cutting more than
doubles the number of rings I can cut per hour, and extends the longevity
of the cutting wheels by three to five times.
The one disadvantage
of using oil, however, is that the finished rings are coated in oil.
This oily coating can be removed by placing the rings in a strainer in
small batches and spraying them with a strong jet of water from a hose.
How many rings
are you going to need?
Lets put it
this way:
So far in my
armour project, I managed to fill a 4 Litre container three times with
rings. That is roughly 3 American gallons! If you are planning
to make something as large as a hauberk, expect to be producing a similar
volume of rings.

Oh Damn! I knew we
weren't ready for this. The darned page isn't finished yet.
Main | Tools
and Materials | Winding the Coils
| Knitting the
Maille | List of Weaves
My Armour
Project | My Other Projects | Accessories
| List of Armour Terms