
Part I: Creating the Skin File Using Wintex 3.4
By Mark Quinn
|
|
|
|
|
|
|
|
I will assume
that you have already created your sprite graphics using your favourite
graphics program such as Paint Shop Pro v 3.12, which can be downloaded
from the Tools section.
With the sprite graphics finished, we can add them to our pwad.
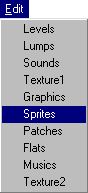 |
To add sprites to your wad (and you will need to if you want to make skins), You will need to go to Wintexs sprite editing window. Click on Edit in the menu bar of Wintexs main window and choose Sprites. This will open the sprite editing window. |
At the bottom of the sprite editing window is an entry window
![]()
Click ![]() to open up the window. Scroll down and select ???????? = Any sprite.
Click on the the question marks to bring up the cursor, then type your
sprite name over them (using the format described in Sprite
Basics) like so..
to open up the window. Scroll down and select ???????? = Any sprite.
Click on the the question marks to bring up the cursor, then type your
sprite name over them (using the format described in Sprite
Basics) like so..
![]()
If your sprite name does not use all eight spaces, type spaces over the remaining question marks.
![]()
Now press
the Add button ![]() ,
then locate your previously created sprite graphic, select it and click
Okay. Wintex 3.4 Will make a copy of the graphic in its sprites
sub directory and display it in the sprite editing window. The name
of the sprite, its x and y offsets, and the name of the name of the original
graphics file will appear in a box below the window displaying the graphic
itself.
,
then locate your previously created sprite graphic, select it and click
Okay. Wintex 3.4 Will make a copy of the graphic in its sprites
sub directory and display it in the sprite editing window. The name
of the sprite, its x and y offsets, and the name of the name of the original
graphics file will appear in a box below the window displaying the graphic
itself.
![]()
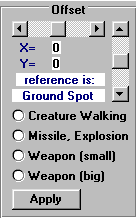
The sprite
starts out with a sprite offset of 0,0. We will have to change this,
because DooM draws the sprite on screen in relation to the spot on the
ground where the sprite stands (Legacy too). With an offset of 0,0
your sprite will appear to be shifted to the right and buried in the ground!
| In
the upper right hand corner of the sprite editing window you will find
the controls for adjusting the sprite offsets. You can adjust the
offsets using the two scroll bars here. Wintex displays a pair
of cross hairs indicating the ground spot to help you.
As a short cut, you can see four radio buttons that will position the sprite according to what it is supposed to represent. Click on Creature Walking to put the sprite in approximately the position of a walking humanoid. You can then fine tune the positioning with the scroll bars. When you
have positioned the sprite where you want it, press |
 |
Press the
Save button ![]() to save the information to wadinfo.txt.
to save the information to wadinfo.txt.
You may now repeat this procedure for each of the remaining sprite graphics you intend to use for your skin.
You will
need to replace the sprite graphics for all the phases of the player sprite,
or Legacy will become very angry with you at run time. Here are the
different phases (frames) used by the player:
|
|
Players walking sequence (4 frames). |
|
|
The Player taking
aim with the pistol, shotgun, DB shotgun, chaingun, rocket launcher, or
the BFG.
|
|
|
The Player firing
his weapon.
(This phase is not used for punching, chainsawing, or firing the plasma gun.) |
|
|
The player in pain from being injured. |
|
|
The players normal death sequence (7 frames). |
|
|
The playerss exploding death sequence (9 frames). |
The minimum number of sprites required for a skin is 23 (if you use only zero angle sprites). The maximum number of sprites is 184 (if you use 8 angles for all phases). The actual number of sprites you will use will be somewhere in-between. The number of player sprites in the original DooM, for example, is 51.
When you
have finished adding all of your sprite graphics, click ![]() to save all your sprite information to wadinfo.txt, then click
to save all your sprite information to wadinfo.txt, then click ![]() to exit the sprite editing window and return to Wintexs main window.
to exit the sprite editing window and return to Wintexs main window.
| Part I: Creating the Skin File |
|
|
|
|