
Part I: Creating the Skin File Using Wintex 3.4
By Mark Quinn
|
|
|
|
|
|
|
|
Sigh.
Here is where it gets tricky.
While the sprite editing window allows you to choose ???????? = Any sprite, and the graphics editing window allows you to choose ???????? = New Graphic, the sound editing window does not have a ???????? = New Sound. The only names you are allowed to choose are the ones that already exist in DooM. That is not very useful.
So what are we going to do?
We could try adding our sounds in Wintex 4.2, but it appears that Wintex 4.2 is just as grudging about adding new sound names. Strike one.
We could assign our new sounds to the existing player sounds, but that would change the sounds for the normal player, not just for our skin. Strike two.
We could assign our new sounds to the sounds used by some of the monsters. Although it would work, I dont think players would appreciate the monsters using strange and inapropriate sounds (i.e. the Trooper clucking, or the Cyberdemons foot going Argh! You got me! instead of thump). Damn. Strike three.
It looks like there is only one thing for us to docheat!
As I have already mentioned, Wintex 3.4 stores all of the information for building your pwad in a text file named wadinfo.txt. Like any text file, wadinfo.txt can be edited. Wintexs sound editing window may not let us add sounds with new names, but that doesn't mean that we cant add them. We will just have to do it manually.
WARNING!
Danger Will Robinson!
You are about to meddle with wadinfo.txt.
If you are not careful, you can foul up the file and ruin all of the wonderful work you have achieved so far.
If you screw
up, I will not be held responsible for the consequences of your boobery.
Dont come
crying to me.
You have been warned.
If you are concerned about possible screw ups, then you can make a back up of wadinfo.txt just in case. If you are stupid like I am, you can just dive right in and get to work.
Return to Wintexs main window if you haven't done so already. Just below the centre of the window is a section marked working directory. In the lower portion of it there is a window labeled Wad Informations.
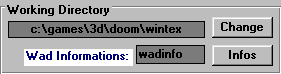
Click on ![]() .
Wintex automatically launch a text editor with wadinfo.txt. If it
doesnt, dont panic. You can just open your favourite text editor
and load it in.
.
Wintex automatically launch a text editor with wadinfo.txt. If it
doesnt, dont panic. You can just open your favourite text editor
and load it in.
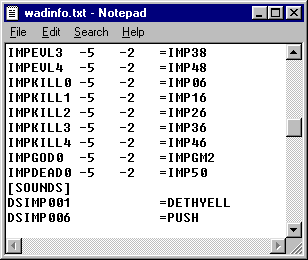
Scroll down until you find the line [SOUNDS]. If [SOUNDS] does not exist yet, scroll down to the bottom of the document and type it in yourself.
Now type in the names of your new sounds. The first two characters must be DS. There is a maximum of eight characters. Follow the sound names with the equal sign and then the name of each of the sound files you are using. Do not include the .wav extension.
Note: The .wav files you are using do not have to have the same name as you are using in your wad.
When you are finished, save the file and exit.
When Wintex 3.4 builds the .wad file, it looks for the sound files in its Sounds subdirectory. In order for your sounds to be included in the pwad, you must copy your .wav files into the Wintexs Sounds subdirectory. If you are running Wintex 3.4 for the first time, you may have to create the directory in order to do this.
Return to
Wintex 3.4.
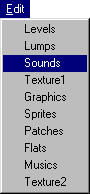 |
Go to the sounds editing window by clicking on Edit in the menu bar of Wintexs main window and and choosing Sounds. |
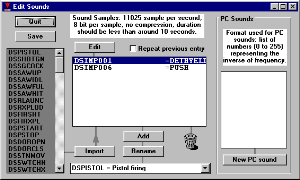 |
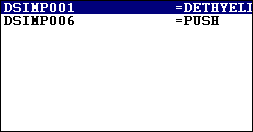
If you have done everything correctly, you should see the names of all your sounds, and the names of all your .wav files listed in the centre window.
Double click on each of the sounds. If you have copied the .wav files into the Sounds subdirectory, Wintex will play the sounds for you.
Now return
to Wintexs main window.
| Adding the Statis Bar Face |
|
|
|
|